4 Stereo Microphone Recording Techniques
Stereo recording is often thought of as the ‘tried and true’ way to record a live performance, and many budding engineers set up 2 microphones at a concert and don’t give it a second thought. There have been many evolutions to the technique over the years, and just as our gear has evolved, so has our knowledge of capturing the stereo field. Some stereo mic techniques specifically enhance the spatial field, while others are better at focusing it. Here are 4 specific methods of utilizing a pair of microphones to capture a performance, along with a brief explanation of why you’d choose that setup.
X-Y

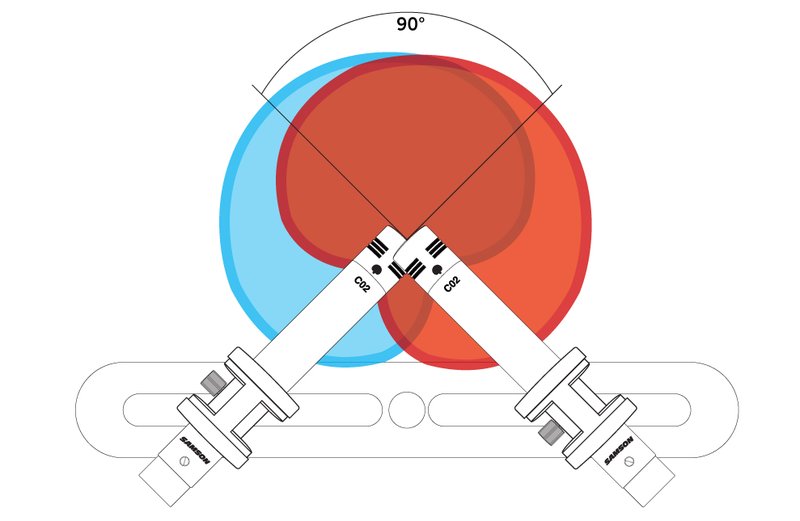
One of the most common patterns you will see chosen for stereo recording is the X/Y, or coincident, stereo setup. In this technique, the two microphones are usually ‘criss-crossed’ over each other at an angle that can vary from 90 degrees to no more than 130 degrees. The reason for this ‘over/under’ configuration is so that the capsules of the microphones are lined up and at the exact same distance from the source to eliminate phasing problems. The stereo image in this case is created by the variations in off-axis attenuation or level – so it’s really crucial that the sound arrives at both capsules at the same time.
When utilizing the X/Y stereo setup, it is crucial that the 2 microphones chosen have identical pickup patterns. You’ll want to closely examine the pickup pattern of the chosen microphone to determine how far you can ‘push’ the angle – not all mics can ‘open up’ farther than 120 degrees in this case. The Samson C02 pencil condenser microphones can help with this technique as they are sold as a matched pair, and the pickup pattern has enough sensitivity at the edges to be useful at a 120 degree placement.
The X/Y pattern has excellent mono compatibility, and can be used at a variety of distances – including extremely close to the source. As long as the off-axis frequency response of the microphones is decent, the center image will be nice and detailed. The one drawback is that this technique does not create a wide stereo image.
Listen here to a recording made with the X/Y stereo microphone technique. Download all four WAV files to compare each.
Spaced Pair

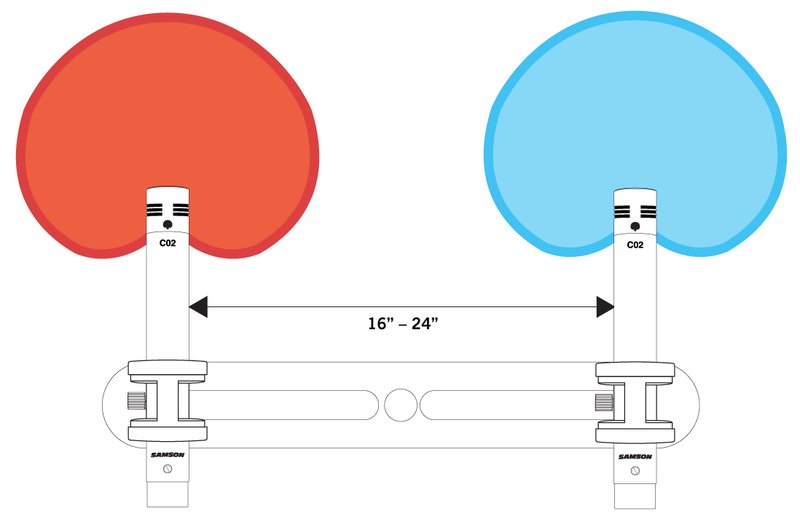
When using a spaced pair, you’ll want to have both microphones pointed directly ‘forward’ in a parallel fashion. The distance between the microphones can be small or large, and generally three times the distance from the source. A good starting point for classical music is 16–24 inches (40–60 cm). When mixing or monitoring, you’ll want to pan each microphone ‘hard’ to its proper side (left and right). Although the capsules are not overlapping like in X/Y, it’s still important that they be both parallel and on an even plane with each other.
Since the mics are capturing more difference in time as well as level, the spaced pair may be a bit trickier to dial in when mixing to mono. Some frequencies may ‘jump out’ or disappear due to phasing issues. If mono compatibility is important to you, it’s definitely going to be something you want to verify ‘on site’ as you set up. One of the benefits of the spaced pair is that you can really get a wide stereo image (if it sounds too wide and unnatural, you’ll want to move the mics closer together). You can even increase this perceived difference by baffling between the pair to prevent overlap.
Listen here to a recording made with the Spaced Pair stereo microphone technique. Download all four WAV files to compare each.
ORTF

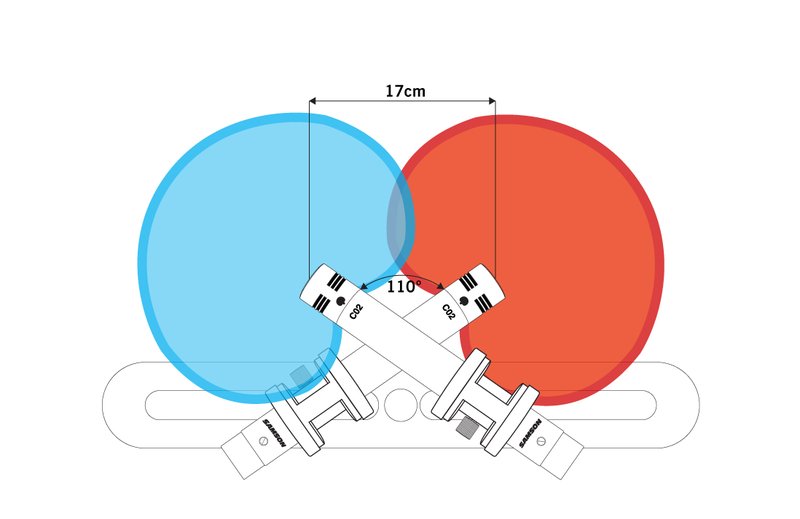
The ORTF mic technique, sometimes referred to as ‘Side Other Side’ was developed in the 60’s for Radio France (ORTF stands for Office de Radiodiffusion Télévision Française). With ORTF, you have your mic capsules aimed with an exact 110 degree angle difference from each other. The mics must also be spaced exactly 17cm apart. Looking at a diagram of it, you can see that this setup approximates the positioning of ears on a human head (although, don’t confuse it with binaural recordings!). Using a mic stand adapter like the Samson DMA2 and a small protractor makes this setup quick and easy to do.
Because the mics are so close together, you don’t have much issue with phasing problems as the sound is likely arriving at each mic close enough to mitigate any problems. This setup also doesn’t often have an issue with mono compatibility, so you can rest easy there. The ORTF placement, like X/Y, should be fairly close. You get a wider image than X/Y and still preserve the center information to a reasonable degree.
Listen here to a recording made with the ORTF stereo microphone technique. Download all four WAV files to compare each.
NOS

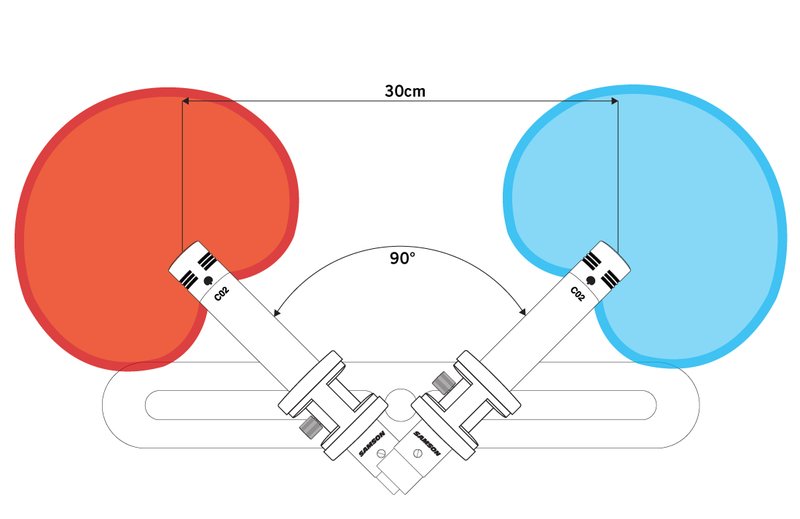
The NOS stereo technique (abbreviated from the initials of the Dutch Broadcast Foundation: Nederlandse Omroep Stichting) is similar to ORTF but utilizes a bit more distance between the mics and a slightly less dramatic angle. You’ll want to be sure your capsules are precisely 30cm from each other and angled at exactly 90 degrees. This eschews any semblance to the human head (unless you’ve got a really big head), and was designed to give a stereo effect that is realistic while maintaining mono compatibility. Also like ORTF, you’ll want to keep track of low frequency falloff as you distance your mics from the source.
This technique is a favorite amongst engineers who record an acoustic piano. You will pick up more room ambiance, have a decent center image, and won’t have to worry much about mono compatibility due to the relatively close placement of the mic capsules. Like X/Y and ORTF, you’ll want to utilize a matched pair of mics and a bracket whenever possible for this setup, and the C02 pencil condensers with DMA2 stand adapter makes it happen quickly and accurately!Nederlandse Omroep Stichting
Listen here to a recording made with the NOS stereo microphone technique. Download all four WAV files to compare each.
